
Weather Station: Stage 1
10 June 2026
Stage 1: First Contact (Or How I Destroyed Two Sensors and used the Wrong Pico)
If you've ended up here, please know this is a series. The remainder of the articles are listed below:
Stage 1, Section 1: The Sensor
In Stage 0, I laid out the plan. Eight stages. Solar-powered. C on bare metal. A "carefully curated menagerie" of sensors. I was brimming with confidence. The kind of confidence that only a person who hasn't actually plugged anything in yet can have.
Stage 1 was supposed to be the easy one. Get the BME280 talking over I2C, read some temperature, humidity and pressure values, push them over WiFi. The "hello world" of weather stations, I said. The foundation everything else builds on, I said.
What actually happened was a masterclass in everything that can go wrong between a plan and a breadboard.
The Sensor Formerly Known As BME280
Let's start with the first discovery. The BME280 I ordered. The one I openly called "hello world" in Stage 0. The temperature-humidity-pressure sensor that was going to anchor the whole project. Well, turns out I don't have any. What I had were BMP280s. No humidity. Just temperature and pressure. The "E" is apparently worth paying attention to.
This is entirely my fault. The listing probably said BMP280 somewhere. The chip ID confirmed it: 0x58 instead of the BME280's 0x60. On the plus side, the BMP280 is basically a BME280 with fewer emotions, and since I'll be adding a proper BME280 in Stage 2 anyway, the humidity gap is temporary. The code is identical minus the humidity register reads.
Lesson learned: check the chip ID before trusting the listing. The datasheet doesn't lie, even when Amazon does (full disclosure, neither lied, I just made a bit of a dick of it).
The Great Breadboard Debacle
The BMP280 module I had came with unsoldered headers.
"That's fine, I'll just pop it into the breadboard and hold it in place while I test the code." This is a sentence that, in hindsight, should have come with a content warning.
The wiring itself was straightforward. Four connections, plus two pins tied high and low for I2C mode and address selection:
| BMP280 Pin | Pico Pin | Purpose |
| --- | --- | --- |
| VCC | Pin 36 (3V3) | Power |
| GND | Pin 38 (GND) | Ground |
| SDA | Pin 6 (GP4) | I2C data |
| SCL | Pin 7 (GP5) | I2C clock |
| CSB | Pin 36 (3V3) | Tie HIGH for I2C mode |
| SDO | Pin 38 (GND) | Tie LOW for address 0x76 |
(I'm absolutely delighted the markdown on that table isn't working - bear with me and I'll make a real table at some point)
Simple. Clean. And working the first few times with some carefully balanced tilting and contact maximisation. I took a brief hiatus to get some exams out the way, and returned to a completely non-functional sensor. This is ultimately because the unsoldered header pins were making approximately zero contact with the sensor's pins. An I2C scan returned no devices. Nothing. The sensor might as well have been in a different room.
I was wiggling the module around and got intermittent, phantom responses at address 0x10, which isn't even a BMP280 address. That's just electrical noise from floating I2C lines pretending to be a device.
Then I Made It Worse
At this point, I started physically holding the sensor module against the unsoldered header to force contact. This worked previously, and briefly again, in the same way that holding a broken umbrella works briefly. I got readings. Real ones! Temperature was plausible. Pressure was plausible. I was pleased. I may even have fist-pumped. For a glorious eight seconds, I was Tony Stark in that cool basement.
And then the sensor got hot. Not warm. Hot. The kind of hot where you think, "that's probably not fine".
What had happened, of course, was that in the process of tilting and pressing the module, I'd accidentally bridged or reversed the power connections. The BMP280 is a tiny, delicate chip. It does not enjoy having VCC and GND swapped. It expresses this lack of enjoyment by converting itself into a very small, very expensive heater.
I swapped in a fresh BMP280 module. Got it working. Felt smug. Then tried the original again "just to confirm it was dead", at which point the original got hot again, and somehow the new one started overheating too. Both sensors: dead. Two BMP280s sacrificed to the electrical engineering gods in the space of about ten minutes. Physics, once again, is undefeated.
Lesson learned: solder your headers before you do anything else. Not after testing. Not "once I've confirmed it works." Before. Unsoldered pins on a sensor are unreliable, but they're also actively dangerous when you start physically pressing components to make contact. The few minutes with a soldering iron aren't optional; they're the difference between "development" and "thermal destruction."
The Third Sensor (With Soldered Headers This Time)
BMP280s have a very sports-like mentality. It was next man up. This guy got soldered to the header 'tout de suite'. Once done, I plugged it into the breadboard using the jumper wires. The header was fixed nicely. It stayed put without being held. I ran the I2C scan.
Nope.
I ran the scan again.
Nope.
Quick check, have I blown this guy too?
Also nope. Praise be. There was no overheating, but there were simply no readings.
So here it was, now I had the soldered sensor failing to read - this was new territory. I got the multimeter out, into the "beep beep" mode (it's got a name, just can't remember it), and sure enough I had committed a sin that sits nicely with the other embarrassing sins... two of the pins had no solder actually making contact. I'll blame tiredness, this was about 0045, but it's yet another rookie error.
A quick resoldering and we're back at the races. I2C scan again:
1I2C scan starting...
2  Device found at 0x76
3Scan complete.
And then the readings:
1BMP280 chip ID: 0x58
2BMP280 ready.
3Temp: 22.79 C  |  Pressure: 993.99 hPa
I held it between my fingers. The temperature climbed to 32°C. I let go. It dropped back. Physics was working. I was working. Nothing was on fire. I am invincible.

Some Thoughts for People Broken Enough to Still Be Reading
Stale Data and the Status Register
One thing I noticed during the breadboard adventures (before I killed the sensors) was that when the module lost contact mid-run, the firmware kept printing the same temperature and pressure values on repeat. No error, no warning, just the last successful reading echoing forever.
It was happening because the Pico's I2C buffer still contains the bytes from the last successful read. When the sensor disappears, the compensation functions happily crunch those stale bytes and produce a plausible-looking but entirely fictional result. In a deployed outdoor station, a connector working loose inside a weatherproof enclosure would be indistinguishable from a genuinely stable temperature.
The fix is polling the BMP280's status register after triggering each measurement. Bit 3 tells you whether a measurement is in progress. If it doesn't clear within a reasonable number of attempts, the sensor isn't responding and you skip the reading rather than serving up stale data:
1uint8_t status;
2int attempts = 0;
3bool sensor_ok = true;
4do {
5    sleep_ms(2);
6    read_regs(REG_STATUS, &status, 1);
7    if (++attempts > 10) {
8        printf("ERROR: BMP280 not responding.\n");
9        sensor_ok = false;
10        break;
11    }
12} while (status & 0x08);
It's a small addition, but it turns a silent failure into an explicit one. When this thing is running unattended on solar power in the garden, I'd much rather have a gap in my data than a lie.
The Compensation Formulas
The BMP280 doesn't give you temperature in degrees or pressure in hectopascals. It gives you raw 20-bit ADC values that mean nothing on their own. Every chip has unique factory-calibrated coefficients burned into it. Twelve of them for temperature and pressure that you run through Bosch's compensation formulas to get real units.
This was a really unexpected curveball and no small education in fixed-point integer arithmetic. Everything is done with bit shifts and 64-bit intermediates to avoid floating-point operations. I love maths, but I couldn't even have told you this branch exists in this application - even though it seems obvious after the fact!
Temperature compensation produces a value in hundredths of a degree (so 2279 = 22.79°C), and critically, it also produces a shared intermediate value called t_fine that the pressure formula depends on. Temperature must be compensated before pressure every single cycle, or you get garbage. It's a dependency that's easy to miss and impossible to debug by looking at the output, since pressure values will look broadly plausible even with a stale t_fine.
Who knew?!
Stage 1, Section 2: WiFi
With the sensor proven, the next step was getting the data off the Pico and onto the network. The Pico 2 WH (the "W" is for wireless, the "H" is for headers; both of these designations, as we'll establish shortly, are worth paying attention to) has a CYW43439 wireless chip that handles 2.4 GHz WiFi.
The networking stack involves three layers:
- The CYW43 driver: Talk to the wireless chip, manage the radio.
- lwIP (Lightweight IP): A minimal TCP/IP stack that runs on the Pico. You have to provide your own configuration file (
lwipopts.h), which AI says the Pico SDK's documentation mentions - but I think/know I'm being lied to. - Your HTTP request: Construct this manually as a string, because there's no HTTP library. Just open a raw TCP connection and write
POST /weather HTTP/1.1\r\n...yourself, like it's 1998. I'm reliably informed that's what devs did in 1998.
The lwIP callback model is quite an interesting bit. Unlike normal blocking code where you call connect() and wait, lwIP requires you to register callback functions that it invokes when things happen. When the TCP connection is established, tcp_connected_cb fires, and you write your HTTP request there. When the server acknowledges receipt, tcp_sent_cb fires and you close the connection. If anything goes wrong, tcp_error_cb fires and you set an error flag.
The duty cycle wraps this nicely: wake the sensor, take a reading, power up WiFi, connect, POST the JSON payload, tear down WiFi, sleep. WiFi is completely off between readings, which is essential for reducing power aggressively enough that we can get the readings in.
1{"temperature": 22.79, "pressure": 993.99}That's the entire payload. Two numbers. Hundreds of lines of C to get them there. The ratio of infrastructure to data in embedded systems is genuinely humbling. I could definitely just have bought one of these pre-built.
The Pico That Wasn't
Now. You may have noticed I've been talking about WiFi in quite theoretical terms. That's because testing it exposed the single most educational mistake of the entire project so far.
I wrote the WiFi code, updated the CMakeLists to link the wireless libraries, and flashed the firmware. The serial output:
1[CYW43] Failed to start CYW43I checked the wiring. I checked the credentials. I checked the network frequency (2.4 GHz only, the CYW43 doesn't do 5 GHz). I updated the SDK. I set the country code. I tried different authentication modes. I ran a WiFi scan. Everything that could be checked was checked.
Then I was absolutely humiliated by the AI:
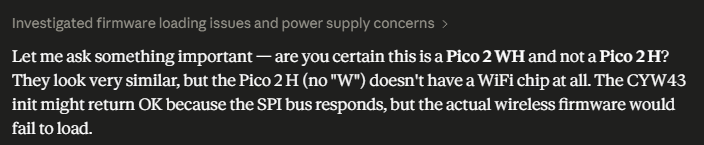
"power supply concerns"
"Let me ask something important"
It was like being guided by a condescending work colleague. FUCK OFF CLAUDE.
The Raspberry Pi Pico 2 WH has a distinctive metal RF shield; a silver rectangular can near one end where the wireless module lives. My board did not have this silver can. Because my board was a Raspberry Pi Pico 2 H. No "W." No wireless chip. No WiFi. I'd been asking firmware to talk to hardware that physically did not exist. I'd began developing a project to build a weather station using a chip that could, at no time, have legitimately sent the data back.
Indescribable levels of humility were delivered in seconds.
In my defence, they look almost identical and I do have a Pico 2 W, it just doesn't have the soldered headers and I've clearly mistook them when getting the Pico ready for development - so a quick order went in and the problem is being resolved.
Never-the-less, the WiFi code compiles and the logic is proven as far as it can be without the actual radio. Once the new board arrives, it's a straight swap. Same pinout, same code, same wiring. Just with, oh, I don't know, the ability to actually transmit data wirelessly like the entire project from the ground up is supposed to be able to do - lolz.
Code Structure: Setting Up for Stage 2
By the end of Stage 1, main.c was sitting at around 200 lines, which is manageable for a single sensor but will get unwieldy fast once the VEML6075, BH1750, and AS3935 arrive in Stage 2. The plan is to refactor into a modular structure: a bmp280.c/h module for the sensor driver, a wifi.c/h module for connectivity, and a slim main.c that just orchestrates the cycle.
The interfaces are clean. The sensor module exposes bmp280_init() and bmp280_read(). The WiFi module exposes wifi_init() and wifi_post_reading(). Main calls them in order. Adding a new sensor in Stage 2 means creating a new module file, adding it to CMakeLists, and calling it from the loop. No touching the WiFi code, no touching the BMP280 code.
What I Actually Learned
Stage 1 was supposed to be simple. Connect a sensor. Read some values. Maybe push them over WiFi. Four hours, tops. What I got instead was a three-day-long education in:
- Read the chip markings: BMP280 != BME280. The "E" costs extra and provides humidity. Check the chip ID register, it doesn't lie.
- Solder first, and solder right: Unsoldered headers on a breadboard are unreliable at best and destructive at worst. The soldering iron is step one, then using it properly is step two. With any luck I'll combine them more effectively in future - I'm normally quite handy with a soldering iron!
- Silent failures are worse than crashes: A sensor that stops responding but leaves stale data in the I2C buffer will produce plausible-looking readings indefinitely. Poll the status register. Make failures explicit.
- Read the product name carefully: The Pico 2 H and the Pico 2 WH are different products. One has WiFi. One does not. The distinction is exactly one letter and one small silver rectangle.
- Sensors have feelings: They punish loose connections, and they will absolutely let you short-circuit them without any visible indication until something starts smoking.
What's Next
Stage 2: bringing the remaining I2C sensors online. The VEML6075 for UV, the BH1750 for ambient light, and the AS3935 for lightning detection. See you there.